How to make Apple's Liquid Glass effect in After Effects (no plugins)
By Spencer Tetik.
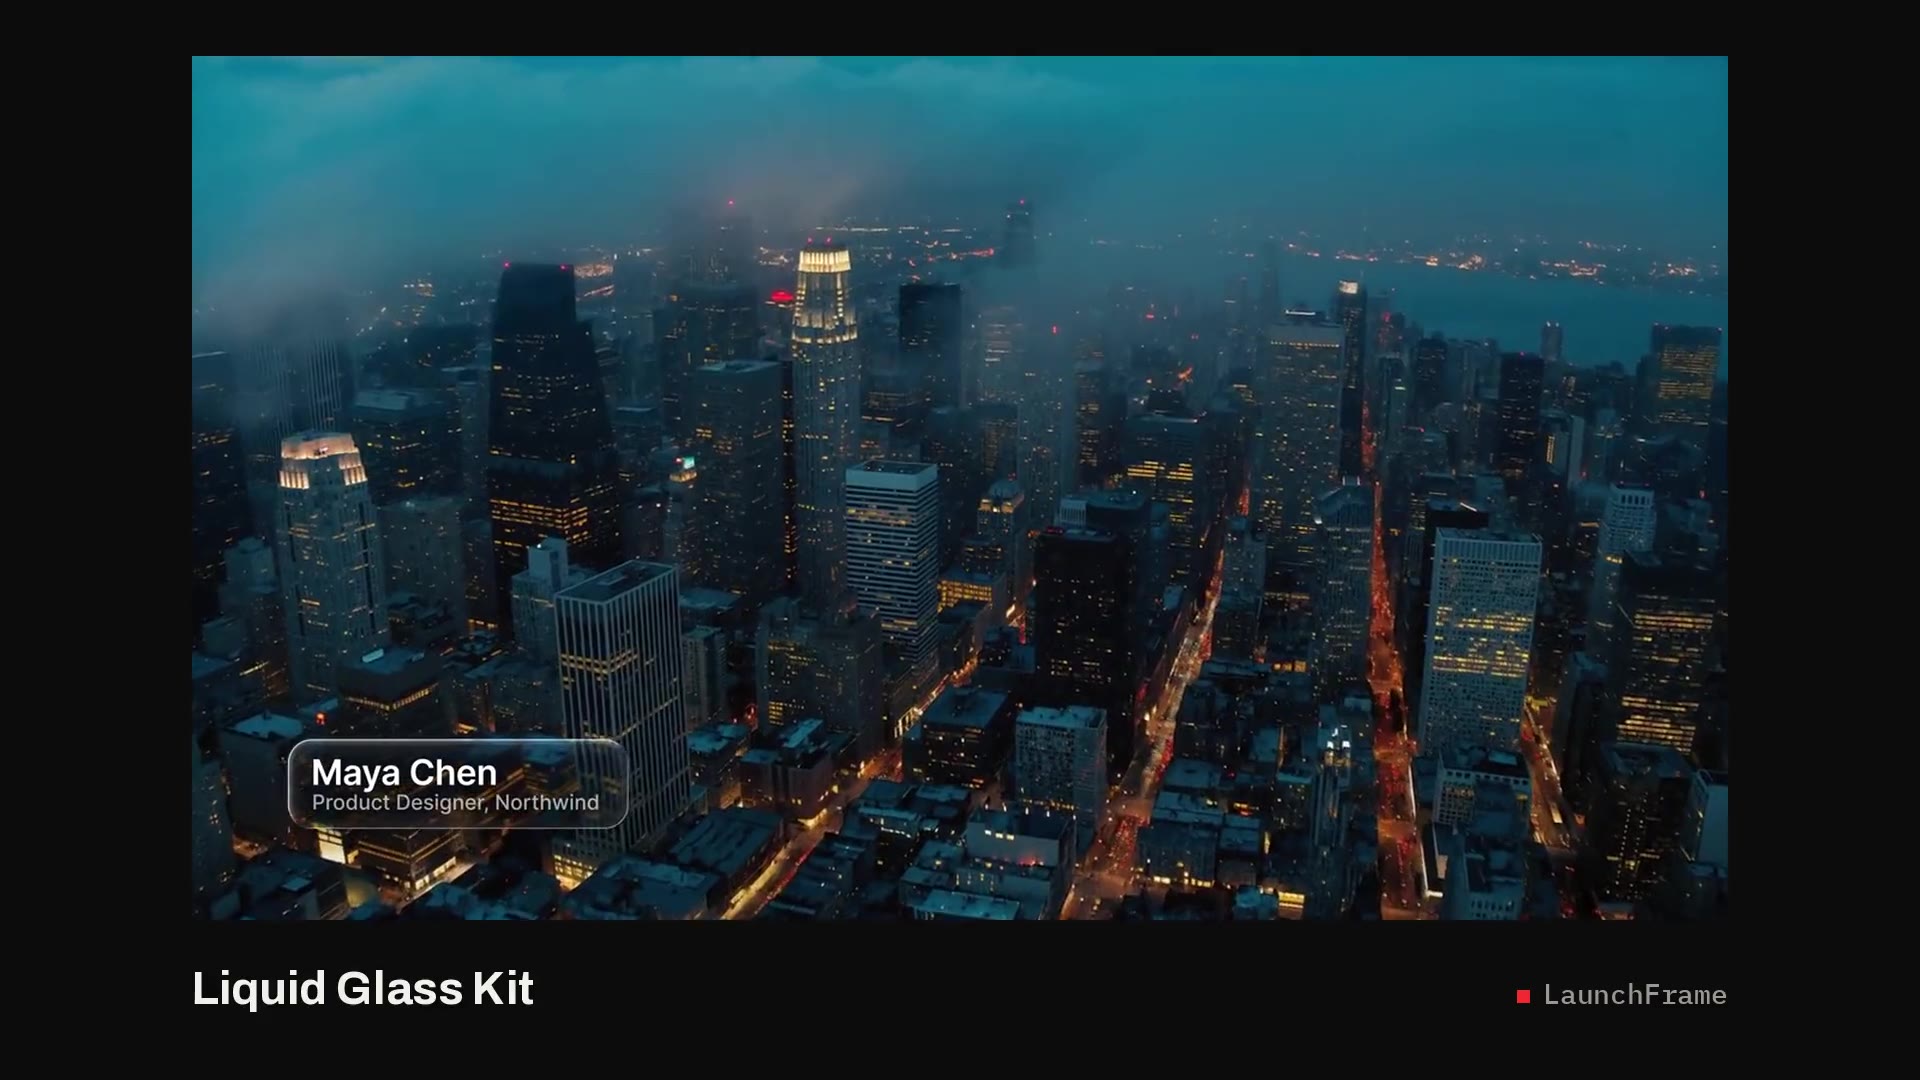
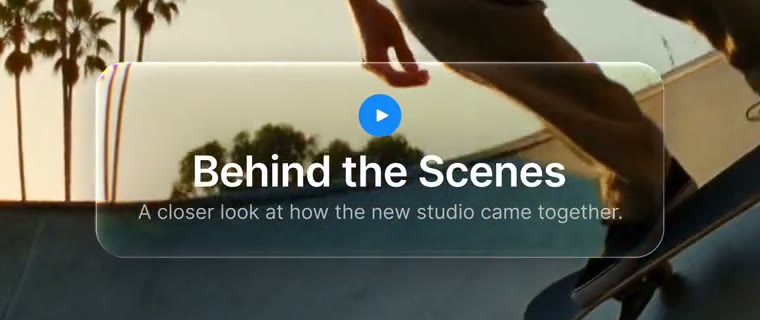
Apple's Liquid Glass, the look of iOS 26, isn't frosted glass. The pane stays clear and the shot behind it bends at the edge like a thick lens: lines curve near the rim, the middle is slightly magnified, colors split where the glass bends hardest, and a thin highlight runs along the edge that faces the light. A blur behind a pale box never moves a pixel of the footage, so it can do none of that.
Here's how we build it for the Liquid Glass Kit, with effects that ship with After Effects 2023 or newer. No plugins. The key: everything reads one map of the glass surface, so the bend, the fringes and the highlight always agree.
The layer stack
In the template comp, bottom to top:
- Background Clip: your footage.
- Glass Map: the refraction map precomp, switched off. Effects read it.
- Glass Matte: the glass silhouette, switched off: the track matte for everything inside the glass.
- Glass Body: an adjustment layer with Transform, Displacement Map, Fast Box Blur and Color Balance (HLS).
- Four dispersion layers that redo the bend for red and blue.
- Tint, shadow and light layers, then the text.
Drive the glass size, centre and corner radius from sliders on one null and point every shape at them by expression, so everything follows the text.
1. Turn the silhouette into a height map, in a precomp
Glass bends light most where its surface is steepest, at the rim. So first build the surface: a grayscale height map, black outside the glass, white on its flat top.
- Make a precomp the size of the template (ours is "LG_LT_Pill Height") with a black solid at the bottom.
- Add a white copy of the glass shape, parented to a null that copies the template's main null by expression, so the map follows the graphic.
- Grow the shape by about 0.15 of the rim width, so the steepest slope lands on the visible edge.
- Round its corners to at least 1.3 times the rim width. Tighter corners make the slopes meet inside the rim, and the bend swirls there.
- Add an adjustment layer with Fast Box Blur (radius about 0.7 of the rim width, 3 iterations), then Levels: Input Black 0.5, Input White 1.0, Gamma 2.0.
Levels keeps the inner half of the blurred edge and bends it into a dome: zero at the edge, rising steeply, flat in the middle. That profile is what reads as thick glass with a rounded edge.
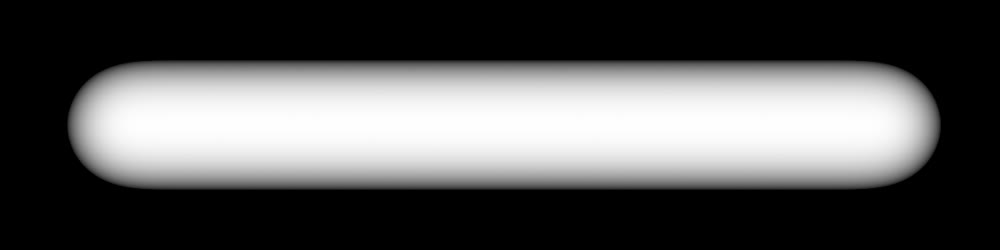
Why a precomp? Effects with a layer picker, Displacement Map included, read the picked layer in its own space, ignoring its transforms and every layer around it. The map in the next step is four offset, blended copies of this height map, and only a precomp flattens that into one layer the picker can read. The height map needs its own comp for the same reason: the map uses it four times.
2. Get the slope: the refraction map
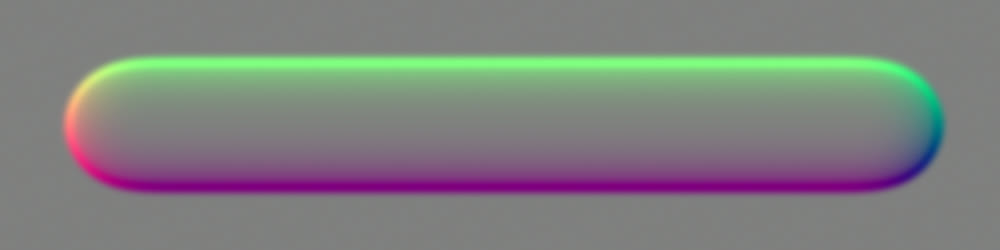
Displacement Map wants direction, not height: how far to move each pixel sideways and up or down, one channel each. That's the slope of the height map, and it takes no expressions:
- Make a second precomp ("LG_LT_Pill Map") with a 50% gray solid at the bottom. Gray means no shift.
- Add the Height precomp four times at 50% opacity, offset by about 0.08 of the rim width: moved left in Add mode, moved right in Subtract, moved up in Add, moved down in Subtract.
- On the horizontal pair, Shift Channels keeps red only (Take Green and Take Blue from Full Off). On the vertical pair, green only.
- Top it with an adjustment layer: a light Fast Box Blur, then Levels from 0.375 to 0.625. That multiplies the slope by four, so the bend hits full strength right at the rim.
Red now holds the horizontal slope and green the vertical, with 0.5 as flat. It's a normal map in all but name.
3. Bend the shot with Displacement Map
Give the Glass Body adjustment layer the silhouette as an Alpha Matte, and add Displacement Map:
- Displacement Map Layer: the Map precomp layer, kept switched off.
- Use For Horizontal Displacement: Red. Use For Vertical Displacement: Green.
- Max Horizontal and Max Vertical Displacement: negative, up to about 0.9 of the rim width. Negative makes the pixels near the rim sample from further out, so the glass pulls in what lies beyond its edge, as a lens does.
- Displacement Map Behavior: Center Map, with Wrap Pixels Around off.
Our Refraction slider scales it (default 60). Small lower thirds get 1.3 to 1.4 times more, or the bend vanishes once the video is scaled to 1080.
4. Magnify with Transform first
Add Transform to Glass Body, above Displacement Map, with Anchor Point and Position at the glass centre and Scale at about 107%. The shot under the glass is now slightly magnified, and Displacement Map bends that magnified image at the rim. The other way round, the zoom would push the bent rim outward past the matte. Keep the zoom small: each pass resamples the image and softens it a little.
5. Split the colors, one channel at a time
Real glass bends red slightly less than blue, which fringes the colors where it bends hardest. Without precomposing the footage, add four adjustment layers above Glass Body, each matted to the silhouette and running Displacement Map from the same Map layer:
- Red, Lighten: about 13% of the main displacement, in the opposite direction. Shift Channels takes red from Red, and green and blue from Full Off. Blend mode Lighten.
- Red, Darken: the same displacement, with green and blue from Full On. Blend mode Darken.
- Blue, Lighten and Blue, Darken: the same pair for blue, at about 14% in the same direction as the main bend.
Lighten can only raise red and Darken can only lower it, while Full Off and Full On leave the other channels alone, so together the pair swaps in a slightly weaker red bend. Because adjustment layers stack, red ends up at about 0.87 of the main bend and blue at 1.14: real red and blue fringes at the rim and nothing in the flat middle. It's exact for edges and thin bright lines; only dark lines thinner than the shift get partly filled in. At Color separation 0 our four layers switch off, which skips four of the six displacement passes.
6. Light the rim with a dot product
The highlight comes from the same map. Lighting a surface is the dot product of its normal and the light direction. Red and green are the normal's X and Y, so a light from the top left is simply their sum:
- Add the Map precomp again, with Channel Mixer set to Monochrome: Red-Red 160, Red-Green 160, Red-Const -110. Flat glass lands on 50% gray, edges facing the top left go brighter and edges facing away go darker. Set the layer to Overlay at about 40%, matted to the silhouette. That's the bevel light.
- For the hairline rim, use a steeper version of the same mix as a Luma Matte for a 1.5 px white stroke of the glass shape in Add mode, faded away from the top left with a 4-Color Gradient. The same mix with its signs flipped mattes a dimmer bounce on the bottom right edges, and a blurred 4 px stroke makes the corner glint.
Reading the same map as the bend puts the highlight exactly where the glass curves. To move the light, change the weights (red alone is light from the left) and adjust the constant so flat glass stays at 50%.
7. Frost, tint and opacity
- Frost: a Fast Box Blur on Glass Body, after Displacement Map. Near zero for clear glass; our Frost slider reaches a 36 px radius at 1080 (72 px at 4K) for fully frosted.
- Vibrancy: Color Balance (HLS) with Saturation at +20, so the shot under the glass looks a touch richer.
- Tint and opacity: the glass shape filled with the tint color at around 10% for clear glass. Our Opacity slider takes it up to a nearly solid pane for text that needs more contrast.
- Legibility: a heavily blurred rounded box behind each line of text, inside the glass, instead of a milky fill.
- Shadow: a blurred, offset black copy of the shape with the silhouette as an inverted Alpha Matte, so it only falls outside the glass.
Glass text: one shape, not one per letter
The same stack works on type, and our Liquid Glass Headline sets the letters themselves in glass. Three things change, or each letter reads as two outlines and every join gets a seam.
- Build every edge from the merged letters. A text layer's fill renders all its letters as one shape, so use fills for the height map, the matte, the tint and the shadow. Don't draw the rim with a text stroke: a stroke traces each letter's own outline, including inside the next letter where two overlap, and "ff" or "AV" get a line through the join. For the rim, make a precomp with the text twice, shrink the top copy by the rim width with Simple Choker and set it to Silhouette Alpha. What's left is a band along the outside of the whole word. Blur the shrunk copy a little and the band fades inward. Light that band with the same luma mattes as step 6.
- Size the bevel for the stroke, not the panel. A 38 px stem can't take a panel's 22 px rim: the height map never flattens and the whole letter turns into bevel. Keep the rim under a third of the stem width, use a gentler Levels gamma (about 1.6) and less slope gain (about 2 times), so the slope peaks at the edge and fades to a flat middle. A slope clipped into a plateau shows its far end as a second outline inside every stem.
- Let the bevel light only brighten. Its dark side gathers wherever an arm meets a stem or two letters meet, and reads as dirt over bright footage. Add Levels after the Channel Mixer with Input Black and Output Black both at 0.5, so Overlay can only lift.
Why it doesn't work as-is in Premiere
All of this reads the Background Clip layer. Export the comp as a Motion Graphics template and Premiere renders it on its own, as if on an empty canvas, then lays the result over the timeline. The template can't see the track below it, so there's nothing to bend. That's true of every glass, blur or distortion template in Premiere.
The fix is to add the Background Clip layer itself to the Essential Graphics panel. In Premiere it becomes a media slot: the editor drags the same clip from the Project panel onto it and matches the in point, and the glass bends a copy that lines up with the shot underneath. A Stencil Alpha layer cuts that copy to the glass shape, so outside it the template stays transparent. If the slot is empty, a sampleImage expression on its alpha notices and thickens the tint into smoked glass. Our guide to glass templates in Premiere covers the editor's side.
Skip the build
Making the look resize with the text, animate at any clip length and survive the trip to Premiere is most of the work. Two shortcuts:
- The free Liquid Glass Pill: a one-line name and role lower third with the whole glass stack, as a Premiere Pro .mogrt plus its After Effects project. The "LG_LT_Pill Height" and "LG_LT_Pill Map" comps from this guide are inside, driven by the sliders on one STYLE layer. It's free with your email.
- The Liquid Glass Kit: 13 templates on the same glass, from lower thirds and titles to a notification, a subscribe toast and two 9:16 versions. One style control restyles all 13, and in Premiere each has the Background clip slot plus Frost, Opacity and Color separation sliders. It's also in LaunchFrame Unlimited.
Using them in Premiere: liquid glass templates for Premiere Pro.
Questions
Do I need a plugin for the Liquid Glass effect?
No. It's built from effects that ship with After Effects: Fast Box Blur, Levels, Shift Channels, Displacement Map, Transform, Channel Mixer, Color Balance (HLS) and 4-Color Gradient. It works in After Effects 2023 or newer.
Why does the refraction map have to be a precomp?
Effects with a layer picker, like Displacement Map, read one layer in its own space and ignore its transforms and the layers around it. The map is four offset copies of the height map blended together, so it has to be flattened into a precomp before Displacement Map can read it.
Why does my glass show swirls in the corners?
The corners of the height map are tighter than the rim is wide, so the slopes meet inside the rim. Round the height map's corners to at least 1.3 times the rim width, and grow its silhouette slightly so the steepest slope sits on the visible edge.
Why does my glass text show double outlines or dark seams where letters touch?
The rim is probably a text stroke: a stroke draws every letter's own outline, also where letters overlap, and if it straddles the edge while the light comes from a blurred height map, you get two lines with a dark gap. Build the rim from the merged letters instead (the text minus a choked copy of itself, in Silhouette Alpha), keep the bevel under a third of the stem width, and let the bevel light only brighten.
Can I use the effect in Premiere Pro?
Yes, as a Motion Graphics template with a Background clip slot. Premiere renders templates on their own, so you drag the same clip into the slot and the glass bends that copy. With the slot empty, the template shows smoked glass instead.
Why is it slow to render?
Each displacement pass resamples the whole frame, and the full look uses six of them at 4K. Set Color separation to 0 to skip four of them, keep Frost at 0, and lower the preview resolution while you work.